민프
[Flutter] BottomNavigation을 만드는 방법 본문
BottomNavigation을 빠르게 구현하고 싶다면 아래 Widget들을 사용해보자
참고로 Flutter는 material 디자인을 체택하고 있는데 아래 링크를 참고헤서 m2랑 무엇이 다른지도 확인해보고 참고해보자
Material Design
Build beautiful, usable products faster. Material Design is an adaptable system—backed by open-source code—that helps teams build high quality digital experiences.
m3.material.io
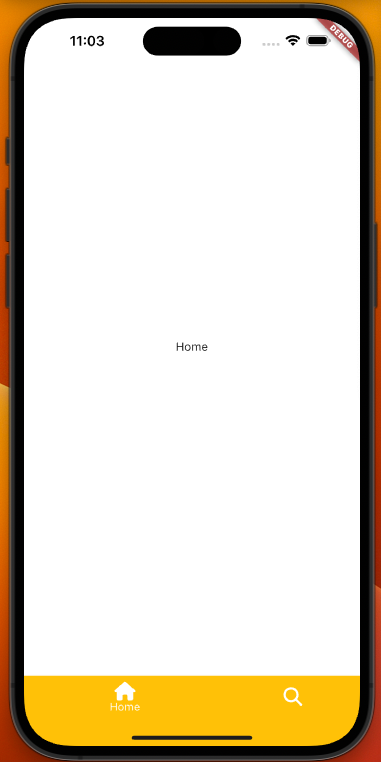
BottomNavigationBar (m2 - material)
class _MainNavigationScreenState extends State<MainNavigationScreen> {
  int _selectedIndex = 0;

  final screens = [
    const Center(
      child: Text('Home'),
    ),
    const Center(
      child: Text('Search'),
    ),
  ];

  void _onTap(int index) {
    setState(() {
      _selectedIndex = index;
    });
  }

  @override
  Widget build(BuildContext context) {
    return Scaffold(
      body: screens[_selectedIndex], // 위젯 리스트에 접근
      bottomNavigationBar: BottomNavigationBar(
        type: BottomNavigationBarType.shifting,
        currentIndex: _selectedIndex, // 인덱스 지정
        onTap: _onTap,
        // selectedItemColor: Theme.of(context).primaryColor,
        items: const [
          BottomNavigationBarItem(
            icon: FaIcon(FontAwesomeIcons.house),
            label: "Home",
            tooltip: "What are you?",
            backgroundColor: Colors.amber,
          ),
          BottomNavigationBarItem(
            icon: FaIcon(FontAwesomeIcons.magnifyingGlass),
            label: "Search",
            tooltip: "What are you?",
            backgroundColor: Colors.blue,
          ),
        ],
      ),
    );
  }
}
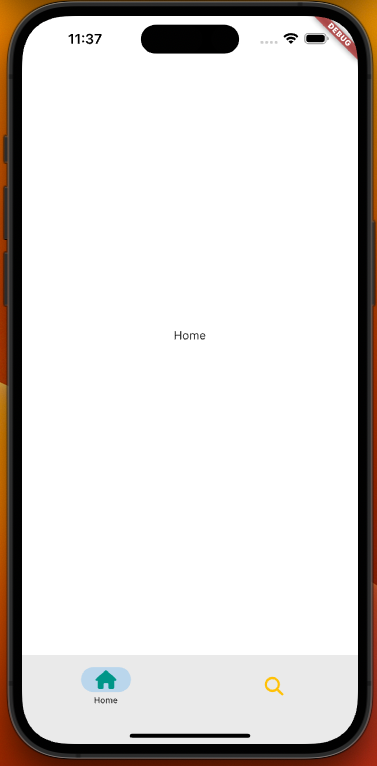
NavigationBar (m3 - material)
class _MainNavigationScreenState extends State<MainNavigationScreen> {
  int _selectedIndex = 0;

  final screens = [
    const Center(
      child: Text('Home'),
    ),
    const Center(
      child: Text('Search'),
    ),
  ];

  void _onTap(int index) {
    setState(() {
      _selectedIndex = index;
    });
  }

  @override
  Widget build(BuildContext context) {
    return Scaffold(
      body: screens[_selectedIndex], // 위젯 리스트에 접근
      bottomNavigationBar: NavigationBar(
        labelBehavior: NavigationDestinationLabelBehavior
            .onlyShowSelected, // BottomNavigationBar - Type이랑 똑같음
        selectedIndex: _selectedIndex,
        onDestinationSelected: _onTap,
        destinations: const [
          NavigationDestination(
            icon: FaIcon(
              FontAwesomeIcons.house,
              color: Colors.teal,
            ),
            label: 'Home',
          ),
          NavigationDestination(
            icon: FaIcon(
              FontAwesomeIcons.magnifyingGlass,
              color: Colors.amber,
            ),
            label: 'Search',
          ),
        ],
      ),
    );
  }
}
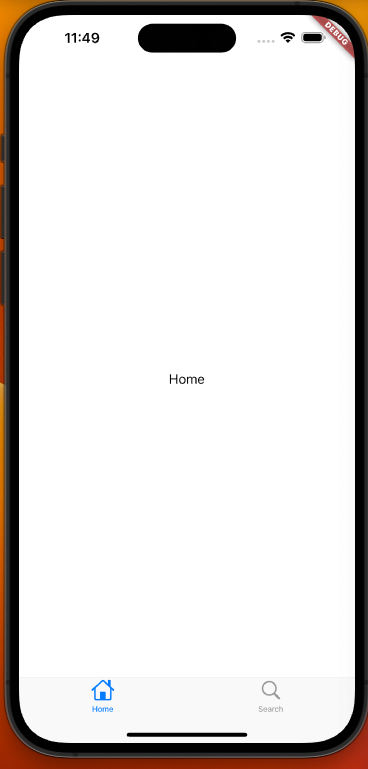
CupertinoTabBar (IOS)
Cupertino 디자인을 쓰고싶다면 main.dart에서부터 CupertinoApp을 사용해야한다
Main.dart


class Main extends StatelessWidget {
  const Main({super.key});

  @override
  Widget build(BuildContext context) {
    return const CupertinoApp(
      title: 'Flutter Demo',
      home: MainNavigationScreen(),
    );
  }
}
MainNavigationScreen.dart
class _MainNavigationScreenState extends State<MainNavigationScreen> {
final int _selectedIndex = 0;
final screens = [
const Center(
child: Text('Home'),
),
const Center(
child: Text('Search'),
),
];
// void _onTap(int index) {
// setState(() {
// _selectedIndex = index;
// });
// }
@override
Widget build(BuildContext context) {
return CupertinoTabScaffold(
tabBar: CupertinoTabBar(
items: const [
BottomNavigationBarItem(
icon: FaIcon(CupertinoIcons.house), label: "Home"),
BottomNavigationBarItem(
icon: FaIcon(CupertinoIcons.search), label: "Search"),
],
),
tabBuilder: (context, index) => screens[index],
);
}
}
CustomBottom & Offstage
https://api.flutter.dev/flutter/widgets/Offstage-class.html
Offstage class - widgets library - Dart API
A widget that lays the child out as if it was in the tree, but without painting anything, without making the child available for hit testing, and without taking any room in the parent. Offstage children are still active: they can receive focus and have key
api.flutter.dev
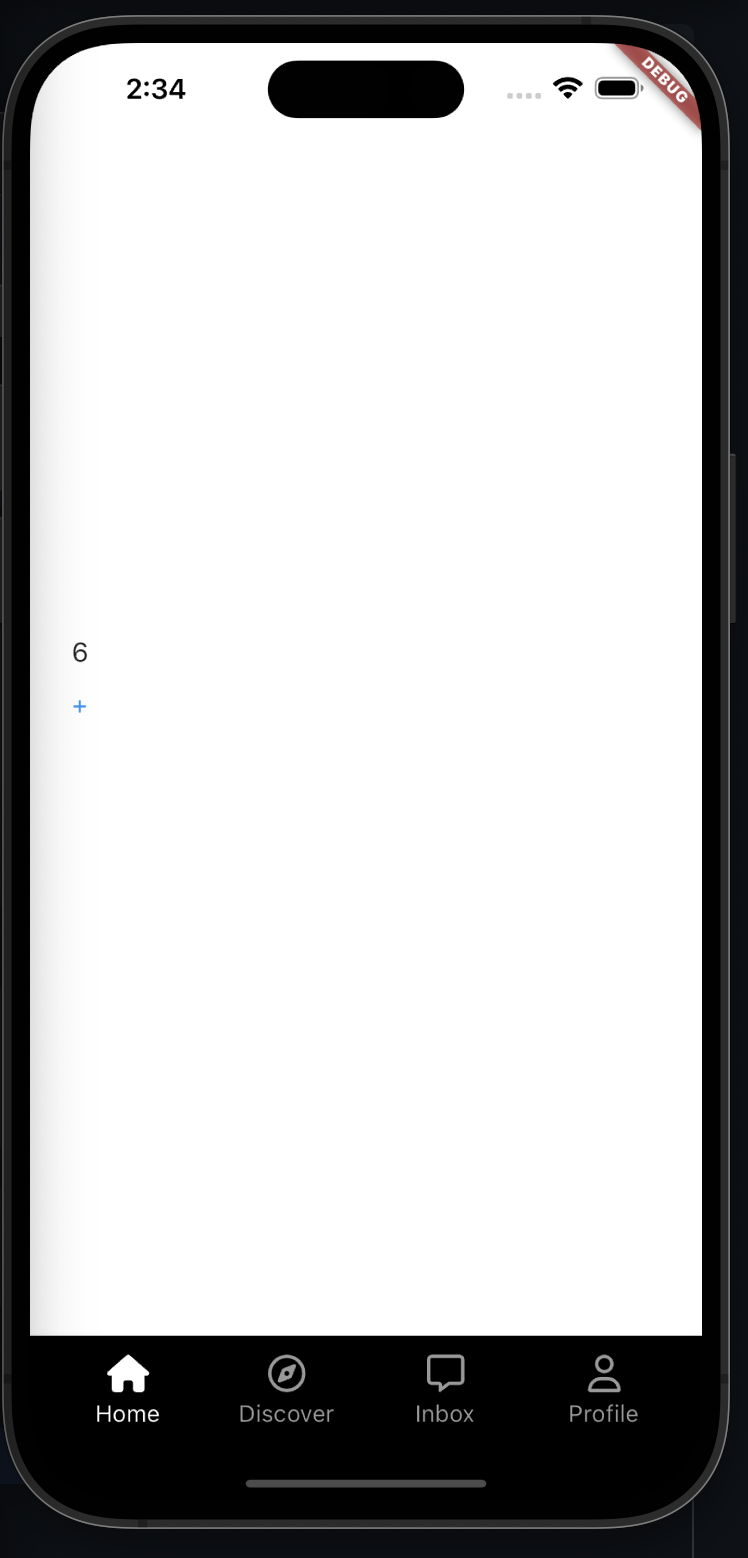
이번엔 CustomBottom에다가 Offstage를 사용해서 화면을 구현해보려고 하는데
Offstage란 아래 결과 사진을 보면서 간단하게 말해보자면
Home에서 다른 페이지로 이동했다가 다시 되돌아왔을 때 새로고침이 안되게 하는 걸 의미한다.
즉, Home에 다시 왔을 때 필요한 API들을 다시 불러올 필요가 없는 로직이 필요할 때 위 위젯을 사용하면 좋을 것 같다.
주의사항은 개발 문서에 아래와 같이 나와있듯
Animations continue to run in offstage children, and therefore use battery and CPU time, regardless of whether the animations end up being visible.
Offstage can be used to measure the dimensions of a widget without bringing it on screen (yet). To hide a widget from view while it is not needed, prefer removing the widget from the tree entirely rather than keeping it alive in an Offstage subtree.
기억을 하고 있다보니 Offstage를 무분별하게 사용되면 배터리, CPU 사용량이 증가해서 필요없는 페이지들은 제거 하는 것이 좋다고 한다
class _MainNavigationScreenState extends State<MainNavigationScreen> {
  int _selectedIndex = 0;

  void _onTap(int index) {
    setState(() {
      _selectedIndex = index;
    });
  }

  @override
  Widget build(BuildContext context) {
    return Scaffold(
      body: Stack(
        children: [
          Offstage(
            offstage: _selectedIndex != 0,
            child: const StfScreen(),
          )
        ],
      ),
      bottomNavigationBar: BottomAppBar(
        color: Colors.black,
        child: Padding(
          padding: const EdgeInsets.all(Sizes.size12),
          child: Row(
            mainAxisAlignment: MainAxisAlignment.spaceBetween,
            children: [
              NavTab(
                text: 'Home',
                isSelected: _selectedIndex == 0,
                selectedIcon: FontAwesomeIcons.house,
                icon: FontAwesomeIcons.house,
                onTap: () => _onTap(0),
              ),
              NavTab(
                text: 'Discover',
                isSelected: _selectedIndex == 1,
                icon: FontAwesomeIcons.compass,
                selectedIcon: FontAwesomeIcons.solidCompass,
                onTap: () => _onTap(1),
              ),
              NavTab(
                text: 'Inbox',
                isSelected: _selectedIndex == 3,
                icon: FontAwesomeIcons.message,
                selectedIcon: FontAwesomeIcons.solidMessage,
                onTap: () => _onTap(3),
              ),
              NavTab(
                text: 'Profile',
                isSelected: _selectedIndex == 4,
                icon: FontAwesomeIcons.user,
                selectedIcon: FontAwesomeIcons.solidUser,
                onTap: () => _onTap(4),
              ),
            ],
          ),
        ),
      ),
    );
  }
}
'Frontend > [Flutter]' 카테고리의 다른 글
| [Flutter] Skia, Impeller 렌더링 엔진에 대해서 알아보자 (0) | 2023.08.29 |
|---|---|
| [Flutter] PageView를 이용해서 Instagram 릴스 같은 페이지를 만들어보자 (0) | 2023.08.11 |
| [Flutter] 다국어 대응을 해보자 | i18n | i10n | Localization | AppLocalizations (0) | 2023.08.10 |
| [Flutter] GestureDetector를 이용해서 화면을 넘기는 Swipe 감지를 해보자 [기록] (0) | 2023.08.10 |
| [Flutter] Stack과 Align 같이 사용하기 [기록] (0) | 2023.08.09 |


