민프
[Flutter] ThemeData, TextTheme를 적용해서 앱의 테마를 지정해보자 본문
앱, 웹을 처음 만들때 프론트엔드에서 다크모드, 라이트모드를 미리 생각하고 만들지 않는다면 디자인 시스템에 빠르게 맞추지 못할수도 있기 때문에 처음 만들때 ThemeData, TextTheme을 미리 설정해놓고 작업을 하는게 좋다.
그래서 ThemeData, TextTheme 화면마다 공통 된 Theme을 적용해보려고 한다.
1. ThemeData 설정
https://api.flutter.dev/flutter/material/ThemeData-class.html
ThemeData class - material library - Dart API
Defines the configuration of the overall visual Theme for a MaterialApp or a widget subtree within the app. The MaterialApp theme property can be used to configure the appearance of the entire app. Widget subtrees within an app can override the app's theme
api.flutter.dev
문서에 의하면 아래와 같이 설명하고 있다.
MaterialApp 테마 속성을 사용하여 전체 앱의 모양을 구성할 수 있습니다
즉, ThemeData를 이용하게 되면 다른 컴포넌트에서 굳이 Style을 지정하지 않아도 main에서 ThemeData를 설정한대로 전역적으로 스타일이 적용되어서 스타일을 관리하는 면에서 용이하다.
아래 코드는 다크모드, 라이트모드 변경에 의한 appBar의 Theme 및 Theme의 따른 텍스트를 변경해보았다.
main.dart
 .
 .
 .
 theme: ThemeData(
        scaffoldBackgroundColor: Colors.white,
        appBarTheme: const AppBarTheme(
          elevation: 0,
          foregroundColor: Colors.black,
          backgroundColor: Colors.white,
          titleTextStyle: TextStyle(
              color: Colors.black,
              fontSize: Sizes.size16 + Sizes.size2,
              fontWeight: FontWeight.bold),
        ),
        primaryColor: const Color(0xFFD11D5C),
      ),
      darkTheme: ThemeData(
        scaffoldBackgroundColor: Colors.black,
        appBarTheme: const AppBarTheme(
          elevation: 0,
          foregroundColor: Colors.white, // 다크 모드에서 아이콘 및 텍스트 색상 변경
          backgroundColor: Colors.black,
          titleTextStyle: TextStyle(
            color: Colors.white,
            fontSize: Sizes.size16 + Sizes.size2,
            fontWeight: FontWeight.bold,
          ),
        ),
        bottomNavigationBarTheme: const BottomNavigationBarThemeData(
          backgroundColor: Colors.black, // 다크 모드에서 배경색 변경
        ),
      ),
만약 컴포넌트에서 내가 원하는 부분은 ThemeData 규칙에 따르는 것이 아닌 따로 커스텀을 해주고 싶을 땐
아래 코드를 추가해서 모드에 따른 분기처리를 해줄 수 있다.
test.dart
.
.
.
Widget build(BuildContext context) {
return Scaffold(
appBar: AppBar(
title: SizedBox(
width: double.infinity,
child: Center(
child: Text(
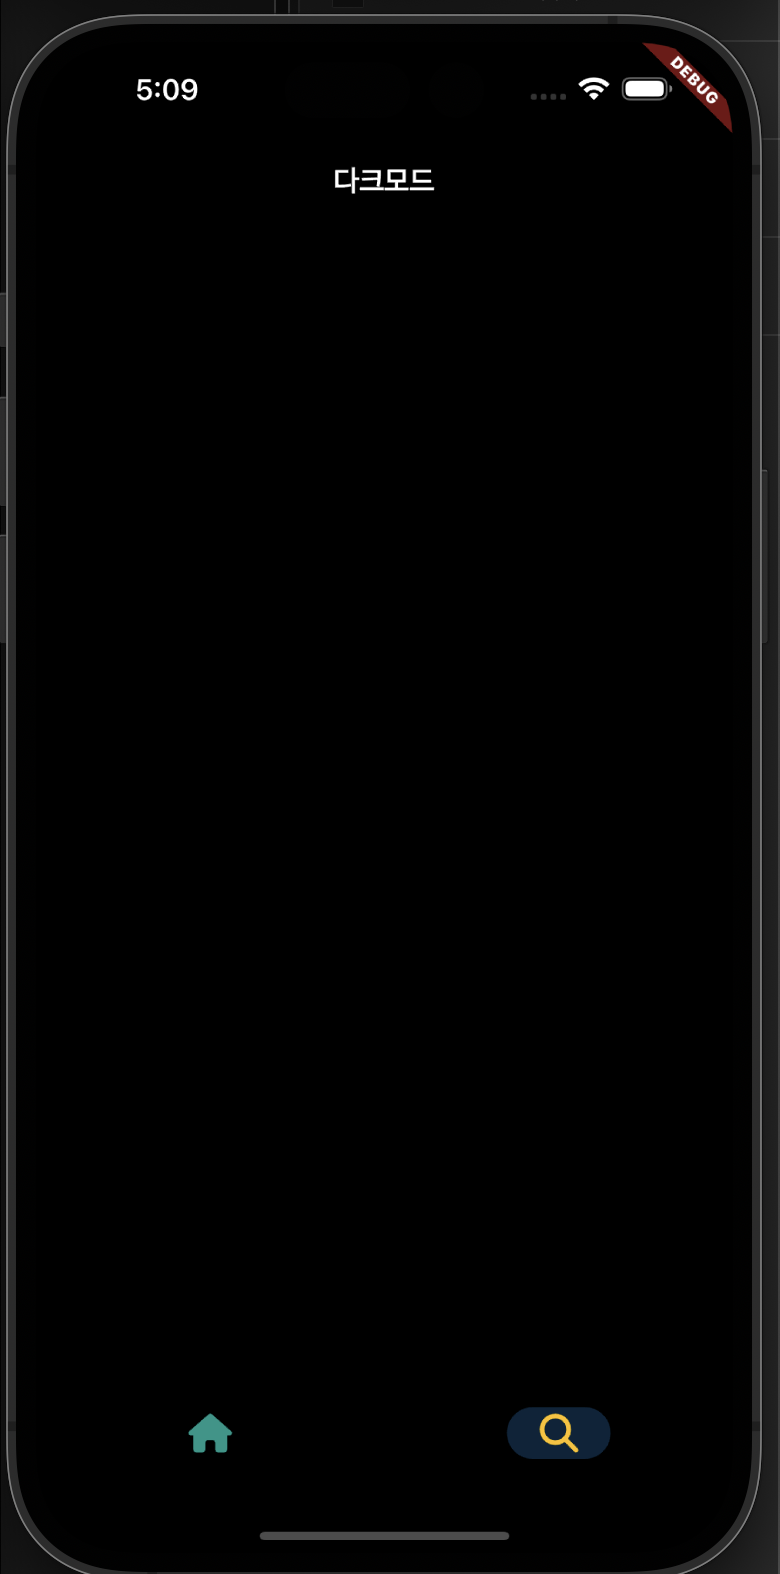
isDarkMode(context) ? "다크모드" : "화이트모드",
style: Theme.of(context).textTheme.headlineLarge,
)),
),
),

2. 폰트 설정
ㅇ. 먼저 폰트를 위해 Google Font 패키지를 설치하자
https://pub.dev/packages/google_fonts/install
google_fonts | Flutter Package
A Flutter package to use fonts from fonts.google.com. Supports HTTP fetching, caching, and asset bundling.
pub.dev
dependencies:
  google_fonts: ^5.1.0
ㅇ. 폰트 설정 값을 가져오자
여기에서는 회사에서 요구하는 or 내가 원하는 폰트를 설정해주면 되는데
나는 테스트를 하는 것 이므로 material2에서 만들어준 TextTheme 설정 값을 가져와서 설정해주려고 한다.
https://m2.material.io/design/typography/the-type-system.html#type-scale
Material Design
Build beautiful, usable products faster. Material Design is an adaptable system—backed by open-source code—that helps teams build high quality digital experiences.
m3.material.io
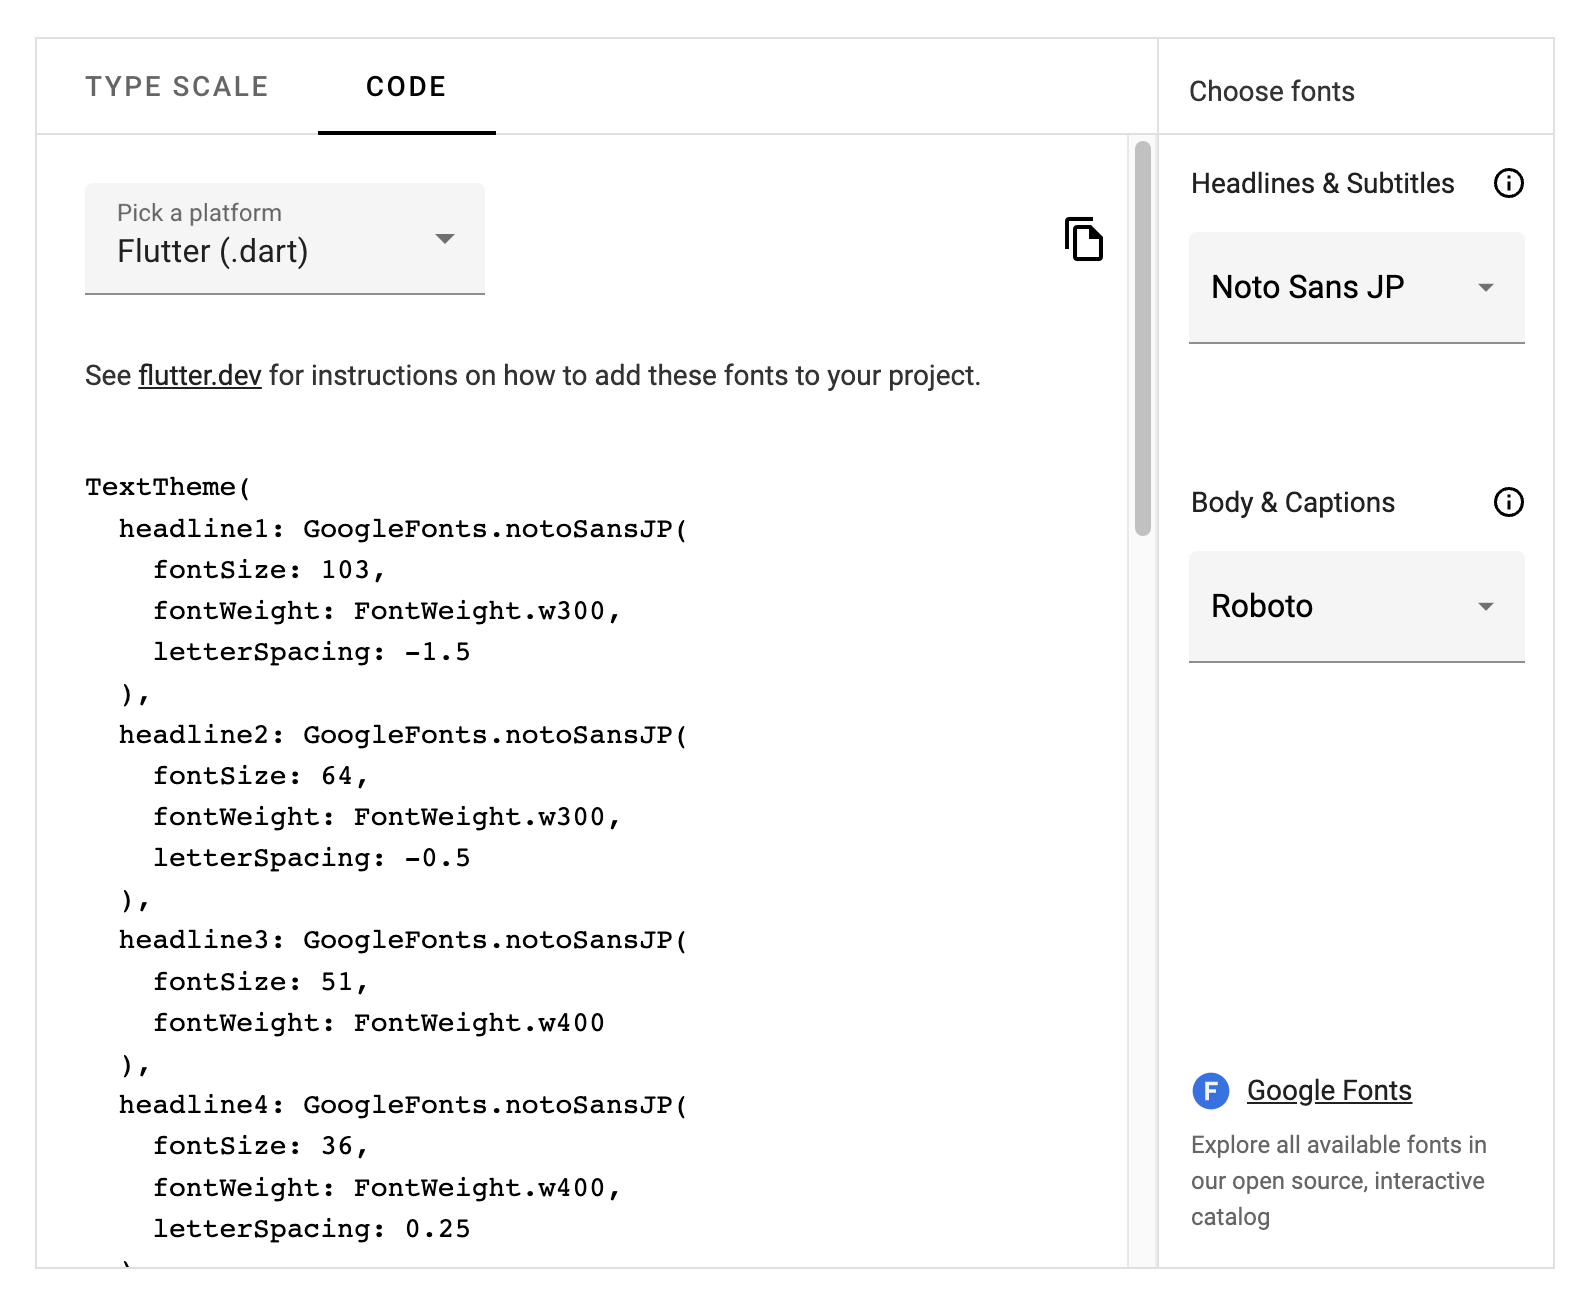
위 코드를 복사해서 TextTheme에 삽입하자
  theme: ThemeData(
          scaffoldBackgroundColor: Colors.white,
          textTheme: TextTheme(
            displayLarge: GoogleFonts.notoSans(
                fontSize: 96,
                fontWeight: FontWeight.w300,
                letterSpacing: -1.5,
                color: Colors.black),
            displayMedium: GoogleFonts.notoSans(
                fontSize: 60, fontWeight: FontWeight.w300, letterSpacing: -0.5),
            displaySmall:
                GoogleFonts.notoSans(fontSize: 48, fontWeight: FontWeight.w400),
            headlineMedium: GoogleFonts.notoSans(
                fontSize: 34, fontWeight: FontWeight.w400, letterSpacing: 0.25),
            headlineSmall:
                GoogleFonts.notoSans(fontSize: 24, fontWeight: FontWeight.w400),
            titleLarge: GoogleFonts.notoSans(
                fontSize: 20, fontWeight: FontWeight.w500, letterSpacing: 0.15),
            titleMedium: GoogleFonts.notoSans(
                fontSize: 16, fontWeight: FontWeight.w400, letterSpacing: 0.15),
            titleSmall: GoogleFonts.notoSans(
                fontSize: 14, fontWeight: FontWeight.w500, letterSpacing: 0.1),
            bodyLarge: GoogleFonts.roboto(
                fontSize: 16,
                fontWeight: FontWeight.w400,
                letterSpacing: 0.5,
                color: Colors.black),
            bodyMedium: GoogleFonts.roboto(
                fontSize: 14, fontWeight: FontWeight.w400, letterSpacing: 0.25),
            labelLarge: GoogleFonts.roboto(
                fontSize: 14, fontWeight: FontWeight.w500, letterSpacing: 1.25),
            bodySmall: GoogleFonts.roboto(
                fontSize: 12, fontWeight: FontWeight.w400, letterSpacing: 0.4),
            labelSmall: GoogleFonts.roboto(
                fontSize: 10, fontWeight: FontWeight.w400, letterSpacing: 1.5),
          ),
          appBarTheme: const AppBarTheme(
            elevation: 0,
            foregroundColor: Colors.black,
            backgroundColor: Colors.white,
            titleTextStyle: TextStyle(
                color: Colors.black,
                fontSize: Sizes.size16 + Sizes.size2,
                fontWeight: FontWeight.bold),
          ),
          primaryColor: const Color(0xFFD11D5C)),
      darkTheme: ThemeData(
        scaffoldBackgroundColor: Colors.black,
        textTheme: TextTheme(
          displayLarge: GoogleFonts.notoSans(
              fontSize: 96,
              fontWeight: FontWeight.w300,
              letterSpacing: -1.5,
              color: Colors.white),
          displayMedium: GoogleFonts.notoSans(
              fontSize: 60, fontWeight: FontWeight.w300, letterSpacing: -0.5),
          displaySmall:
              GoogleFonts.notoSans(fontSize: 48, fontWeight: FontWeight.w400),
          headlineMedium: GoogleFonts.notoSans(
              fontSize: 34, fontWeight: FontWeight.w400, letterSpacing: 0.25),
          headlineSmall:
              GoogleFonts.notoSans(fontSize: 24, fontWeight: FontWeight.w400),
          titleLarge: GoogleFonts.notoSans(
              fontSize: 20, fontWeight: FontWeight.w500, letterSpacing: 0.15),
          titleMedium: GoogleFonts.notoSans(
              fontSize: 16, fontWeight: FontWeight.w400, letterSpacing: 0.15),
          titleSmall: GoogleFonts.notoSans(
              fontSize: 14, fontWeight: FontWeight.w500, letterSpacing: 0.1),
          bodyLarge: GoogleFonts.roboto(
              fontSize: 16,
              fontWeight: FontWeight.w400,
              letterSpacing: 0.5,
              color: Colors.white),
          bodyMedium: GoogleFonts.roboto(
              fontSize: 14, fontWeight: FontWeight.w400, letterSpacing: 0.25),
          labelLarge: GoogleFonts.roboto(
              fontSize: 14, fontWeight: FontWeight.w500, letterSpacing: 1.25),
          bodySmall: GoogleFonts.roboto(
              fontSize: 12, fontWeight: FontWeight.w400, letterSpacing: 0.4),
          labelSmall: GoogleFonts.roboto(
              fontSize: 10, fontWeight: FontWeight.w400, letterSpacing: 1.5),
        ),
        appBarTheme: const AppBarTheme(
          elevation: 0,
          foregroundColor: Colors.white, // 다크 모드에서 아이콘 및 텍스트 색상 변경
          backgroundColor: Colors.black,
          titleTextStyle: TextStyle(
            color: Colors.white,
            fontSize: Sizes.size16 + Sizes.size2,
            fontWeight: FontWeight.bold,
          ),
        ),
        bottomNavigationBarTheme: const BottomNavigationBarThemeData(
          backgroundColor: Colors.black, // 다크 모드에서 배경색 변경
        ),
      ),
위에서 정의한 TextTheme을 사용할 때에는 아래와 같이 사용하면 된다.
  test.dart
  .
  .
  .

  @override
  Widget build(BuildContext context) {
    return Scaffold(
      appBar: AppBar(
        title: SizedBox(
          width: double.infinity,
          child: Center(
              child: Text(
            isDarkMode(context) ? "다크모드" : "화이트모드",
            style: Theme.of(context).textTheme.bodyLarge,
          )),
        ),
      ),
3. 색상 값 관리
ColorStyles.dart라는 파일을 따로 만들어서 관리하는게 좋다.
import 'package:flutter/material.dart';

class ColorStyles {
  static const Color lightPrimary = Colors.red;
  static const Color darkPrimary = Colors.blue;
  static const Color darkGray = Color(0xff494949);
}
아래 코드는 사용 예시이다.
  bodyLarge: GoogleFonts.roboto(
          fontSize: 16,
          fontWeight: FontWeight.w400,
          letterSpacing: 0.5,
          color: ColorStyles.darkPrimary),
위 코드에서는 main에 Theme설정 소스들을 그대로 넣었는데
Theme소스들을 main에 그대로 넣어버리면 소스가 길어지므로 아래 코드와 같이 Class를 따로 만들어 관리하는게 좋다.
utils.dart
.
.
.
import 'package:flutter/material.dart';
import 'package:google_fonts/google_fonts.dart';

import 'constans/sizes.dart';

bool isDarkMode(BuildContext context) =>
    MediaQuery.of(context).platformBrightness == Brightness.dark;

class Themes {
  static final light = ThemeData.light().copyWith(
    scaffoldBackgroundColor: Colors.white,
    textTheme: TextTheme(
      displayLarge: GoogleFonts.notoSans(
          fontSize: 96,
          fontWeight: FontWeight.w300,
          letterSpacing: -1.5,
          color: Colors.black),
      displayMedium: GoogleFonts.notoSans(
          fontSize: 60, fontWeight: FontWeight.w300, letterSpacing: -0.5),
      displaySmall:
          GoogleFonts.notoSans(fontSize: 48, fontWeight: FontWeight.w400),
      headlineMedium: GoogleFonts.notoSans(
          fontSize: 34, fontWeight: FontWeight.w400, letterSpacing: 0.25),
      headlineSmall:
          GoogleFonts.notoSans(fontSize: 24, fontWeight: FontWeight.w400),
      titleLarge: GoogleFonts.notoSans(
          fontSize: 20, fontWeight: FontWeight.w500, letterSpacing: 0.15),
      titleMedium: GoogleFonts.notoSans(
          fontSize: 16, fontWeight: FontWeight.w400, letterSpacing: 0.15),
      titleSmall: GoogleFonts.notoSans(
          fontSize: 14, fontWeight: FontWeight.w500, letterSpacing: 0.1),
      bodyLarge: GoogleFonts.roboto(
          fontSize: 16,
          fontWeight: FontWeight.w400,
          letterSpacing: 0.5,
          color: Colors.black),
      bodyMedium: GoogleFonts.roboto(
          fontSize: 14, fontWeight: FontWeight.w400, letterSpacing: 0.25),
      labelLarge: GoogleFonts.roboto(
          fontSize: 14, fontWeight: FontWeight.w500, letterSpacing: 1.25),
      bodySmall: GoogleFonts.roboto(
          fontSize: 12, fontWeight: FontWeight.w400, letterSpacing: 0.4),
      labelSmall: GoogleFonts.roboto(
          fontSize: 10, fontWeight: FontWeight.w400, letterSpacing: 1.5),
    ),
  );

  static final dark = ThemeData.dark().copyWith(
    scaffoldBackgroundColor: Colors.black,
    textTheme: TextTheme(
      displayLarge: GoogleFonts.notoSans(
          fontSize: 96,
          fontWeight: FontWeight.w300,
          letterSpacing: -1.5,
          color: Colors.white),
      displayMedium: GoogleFonts.notoSans(
          fontSize: 60, fontWeight: FontWeight.w300, letterSpacing: -0.5),
      displaySmall:
          GoogleFonts.notoSans(fontSize: 48, fontWeight: FontWeight.w400),
      headlineMedium: GoogleFonts.notoSans(
          fontSize: 34, fontWeight: FontWeight.w400, letterSpacing: 0.25),
      headlineSmall:
          GoogleFonts.notoSans(fontSize: 24, fontWeight: FontWeight.w400),
      titleLarge: GoogleFonts.notoSans(
          fontSize: 20, fontWeight: FontWeight.w500, letterSpacing: 0.15),
      titleMedium: GoogleFonts.notoSans(
          fontSize: 16, fontWeight: FontWeight.w400, letterSpacing: 0.15),
      titleSmall: GoogleFonts.notoSans(
          fontSize: 14, fontWeight: FontWeight.w500, letterSpacing: 0.1),
      bodyLarge: GoogleFonts.roboto(
          fontSize: 16,
          fontWeight: FontWeight.w400,
          letterSpacing: 0.5,
          color: Colors.white),
      bodyMedium: GoogleFonts.roboto(
          fontSize: 14, fontWeight: FontWeight.w400, letterSpacing: 0.25),
      labelLarge: GoogleFonts.roboto(
          fontSize: 14, fontWeight: FontWeight.w500, letterSpacing: 1.25),
      bodySmall: GoogleFonts.roboto(
          fontSize: 12, fontWeight: FontWeight.w400, letterSpacing: 0.4),
      labelSmall: GoogleFonts.roboto(
          fontSize: 10, fontWeight: FontWeight.w400, letterSpacing: 1.5),
    ),
    appBarTheme: const AppBarTheme(
      elevation: 0,
      foregroundColor: Colors.white, // 다크 모드에서 아이콘 및 텍스트 색상 변경
      backgroundColor: Colors.black,
      titleTextStyle: TextStyle(
        color: Colors.white,
        fontSize: Sizes.size16 + Sizes.size2,
        fontWeight: FontWeight.bold,
      ),
    ),
  );
}
위 처럼 Class를 만들어놓고 아래와 같이 적용하면 확실히 코드가 깔끔해진 것을 확인할 수 있다.
main.dart
.
.
.
  @override
  Widget build(BuildContext context) {
    return MaterialApp(
      title: 'Test',
      localizationsDelegates: const [
        AppLocalizations.delegate,
        GlobalMaterialLocalizations.delegate,
        GlobalCupertinoLocalizations.delegate,
        GlobalWidgetsLocalizations.delegate,
      ],
      supportedLocales: const [
        Locale("en"),
        Locale("ko"),
      ],
      theme: Themes.light,
      darkTheme: Themes.dark,
      home: const MainNavigationScreen(),
    );
}'Frontend > [Flutter]' 카테고리의 다른 글
| [Flutter] showModalBottomSheet(바텀시트)를 사용해보자 (0) | 2023.09.08 |
|---|---|
| [Flutter] animation 효과를 적용해보자 (animationController, SingleTickerProviderStateMixin, vsync) (0) | 2023.09.07 |
| [Flutter] Flutter 아키텍쳐를 알아보자 (0) | 2023.08.29 |
| [Flutter] Skia, Impeller 렌더링 엔진에 대해서 알아보자 (0) | 2023.08.29 |
| [Flutter] PageView를 이용해서 Instagram 릴스 같은 페이지를 만들어보자 (0) | 2023.08.11 |


